Avec le « par cœur », un mot oublié peut conduire au trou noir. Ce n’est pas le cas lorsqu’on conte. En fonction du lieu, du contexte, de l’auditoire avec lequel on interagit, on peut ajouter ou enlever des éléments à l’histoire, en prenant soin de ne pas changer la logique du récit. Pour cela, le conteur s’appuie sur les moments clé de l’histoire, sans lesquels le récit perdrait son sens. Sur ce « squelette » de l’histoire, le conteur ajoute de la « chair ». Le dessin étant l’un des meilleurs moyens mnémotechniques, on peut dessiner ces moments clé pour s’exercer à visualiser mentalement les étapes de l’histoire.
OBJECTIFS
➤ UTILISER SA MÉMOIRE VISUELLE
• Permet de se souvenir de l’histoire dans tous ses détails en s’appuyant sur quelques images faciles à retenir
• Favorise l’intériorisation du récit
• Renforce la mémoire visuelle
Cette technique est très efficace pour construire une mémoire profonde qui libère l’improvisation, pour utiliser ses propres mots et raconter
COMMENT FAIRE ?
👉 REPÉREZ LES MOMENTS IMPORTANTS
Les organiser : Que se passe-t-il en premier ? Et ensuite ?
👉 DESSINEZ LES ÉTAPES DE L’HISTOIRE
Pour vous en souvenir dans le bon ordre, optez pour des dessins simples : le but est que vous les identifiez rapidement car ce document ne servira qu’à vous.
Dessiner la carte du conte n’est pas un projet artistique ! Quelques traits de crayon esquissés suffisent. Consacrez-y 5 à 10 minutes, pas plus. Si un élève a des difficultés, essayez de l’accompagner jusqu’au bout ou proposez-lui de choisir un autre conte.
🌸 Suggestions :
• Utilisez des formes géométriques. Vous pouvez créer votre propre code (un triangle noir pour un loup, etc.)
• Gommettes de couleur à la manière de Warja Lavater, illustratrice connue pour ses livres de contes en accordéon.
• Le but de l’activité est de privilégier le recours à la représentation imagée donc éviter au maximum l’écriture.
👉 RACONTEZ !
Lorsque les élèves ont terminé leurs cartes, demandez-leur de vérifier que cela fonctionne pour raconter. Cela les a-t-il aidés ?
ACTIVITÉS
💡 LA CARTE COLLECTIVE
Commencez à construire (vous pouvez le faire au tableau) une carte de conte collective, en faisant participer les enfants, pour les aider à identifier les moments clés de l’histoire. Une fois ce premier modèle de carte terminé, vous pouvez demander aux élèves de dessiner leur propre carte.
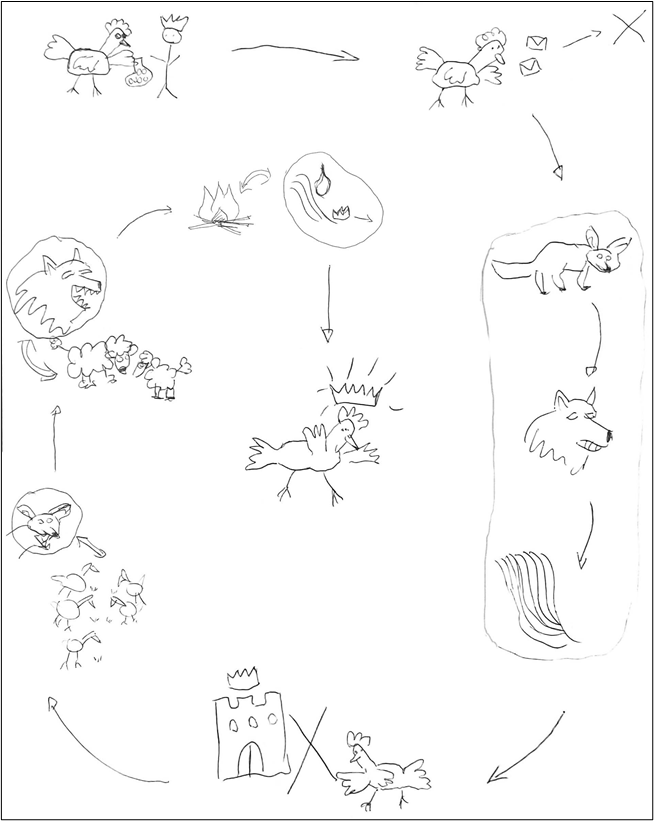
Exemple : « Moitié de poulet » quitte sa maison pour réclamer les cent couronnes que le roi lui a empruntées. Sur le chemin, il rencontre un renard, un loup et une rivière, et les emmène avec lui. Chacun de ces nouveaux amis l’aidera à convaincre le roi de lui rembourser les cent couronnes.
💡 MÉLANGEZ LES ÉTAPES !
À partir de la carte collective, demandez aux élèves de dessiner chacun une étape de l’histoire sur une feuille ou sur un papier cartonné. Mélangez les cartes et demandez-leur de les remettre dans le bon ordre. Cela les entraînera à mémoriser l’enchaînement des moments clés de l’histoire.
💡 JOUEZ AVEC LES ÉMOTIONS
Certains conteurs aiment associer moments clés et émotions, afin d’être plus à l’aise lorsqu’ils racontent l’histoire. Essayez d’associer à chaque moment clé de l’histoire une émotion. Notez-la sur chacune des cartes (vous pouvez recourir à un code couleur selon les émotions (rire /tristesse /violence /mystère /rêverie /bonheur…)
💡 LE CONTE À LA MAISON
Renforcez le lien entre l’école et la maison : les élèves peuvent emporter leur carte chez eux pour raconter l’histoire à la maison. Les familles ensuite peuvent partager leur expérience d’écoute au travers d’un questionnaire ou d’un enregistrement !
LE SAVIEZ-VOUS ?
💬 UNE MÉMOIRE D’ÉLÉPHANT !
Autrefois, certains conteurs illettrés étaient capables de raconter des histoires pendant une ou plusieurs nuits. Ils pouvaient mémoriser des épopées de plus de 500 000 vers ! Pourtant, ces histoires étaient transmises oralement. Comment fonctionnait leur prodigieuse mémoire ?
Ils se servaient avant tout de la mémoire auditive, en s’appuyant sur le rythme, la répétition et la mélodie…
Mais ils pouvaient également s’appuyer sur la mémoire visuelle. Les conteurs développaient la capacité de visualiser des schémas narratifs qu’ils reprenaient souvent à l’identique, qui leur servaient de base pour construire leurs récits.
Certains conteurs traditionnels du nord du Canada expliquaient qu’ils suivaient le personnage de leur histoire, au fil de la narration, sur un chemin d’images, « en regardant par-dessus son épaule. » C’est ainsi que se dessinait son parcours à travers différents lieux situés sur une carte représentant l’ensemble des événements possibles du récit. Le conteur se déplace, comme dans un labyrinthe, sur cette carte globale.
Cette vision cartographiée, en deux dimensions, n’est pas linéaire. Elle est utile pour relier différentes idées entre elles et créer de la pensée.
Dans l’Antiquité, Cicéron, reprenant vraisemblablement un héritage de la culture rhétorique grecque, a théorisé un art de la mémoire à destination des orateurs dans trois traités, notamment, De oratore. Pour s’entraîner à la mémorisation de leurs discours, il propose aux avocats qui ont à plaider d’imaginer des lieux ou des objets en les associant aux idées et aux étapes des discours à tenir. Les liens établis entre ces lieux et ces objets constituent une sorte d’espace mental qui facilite la mémorisation du discours et améliore la qualité de l’éloquence.